According to the spring.io docs, stand-alone Spring Boot applications can be packaged as a WAR or JAR, which can be deployed to any Servlet 3.1+ compatible container.
You might think this is possible out of the box, but in reality we’ll need a couple of tweaks. Nothing too complicated.
Let’s use the example REST service application provided by the Spring guides. As a quick reminder, all this app does is respond to HTTP Get requests with a greeting in JSON format.
To deploy the app to an external server, first we extend SpringBootServletInitializer; this is the only change in the application code we are going to need.
package hello;

import org.springframework.boot.SpringApplication;
import org.springframework.boot.autoconfigure.SpringBootApplication;
import org.springframework.boot.web.servlet.support.SpringBootServletInitializer;

@SpringBootApplication
public class Application extends SpringBootServletInitializer {

    public static void main(String[] args) {
        SpringApplication.run(Application.class, args);
    }
}
Next we edit the gradle.build file.
Remember that Spring Boot apps run in the embedded Tomcat Server. Since our target HTTP runtime (WildFly) uses the Undertow servlet, we don’t want any Tomcat stuff on the classpath.
Let’s exclude the spring-boot-starter-tomcat module from the parent project.
In this article, we’ll explore how we can employ Java EE technologies and Angular to develop a CRUD web application.
The CRUD acronym refers to the four basic functions of persistent storage: Create, Read, Update and Delete.
The acronym may be extended to CRUDL to cover listing of large data sets which bring additional complexity such as pagination, when the data sets are too large to hold easily in memory.
The four CRUD operations correspond closely with the HTTP methods GET, PUT, POST, DELETE and with the SQL queries SELECT, INSERT, UPDATE, DELETE.
We can provide users with the ability to manipulate data in a remote data store by consuming a REST service from a web client application. An example of how to do this will be given using a demo app called Thrifty.
Thrifty is a personal budget application. The application enables the user to create, inspect and edit expenses and generate charts across different dimensions that reflect his spending trends.
The various features of the app are not important. What matters is that the user can create and edit records in a database. The records primarily represent expenses, but the system also allows the user to define labels and categories and link them to his expenses, for classification purposes.
To understand how to design a CRUD application, we start with the database layer. First we review the properties, validation constraints and associative relationships specific to the entities in our conceptual model. The conceptual model is translated into a physical database schema.
In the next step we implement a RESTful web service using JAX-RS technology and develop the persistence solution with JPA and Hibernate.
Finally, we use the Angular framework to build the client interface.
Let’s begin.
Entity model
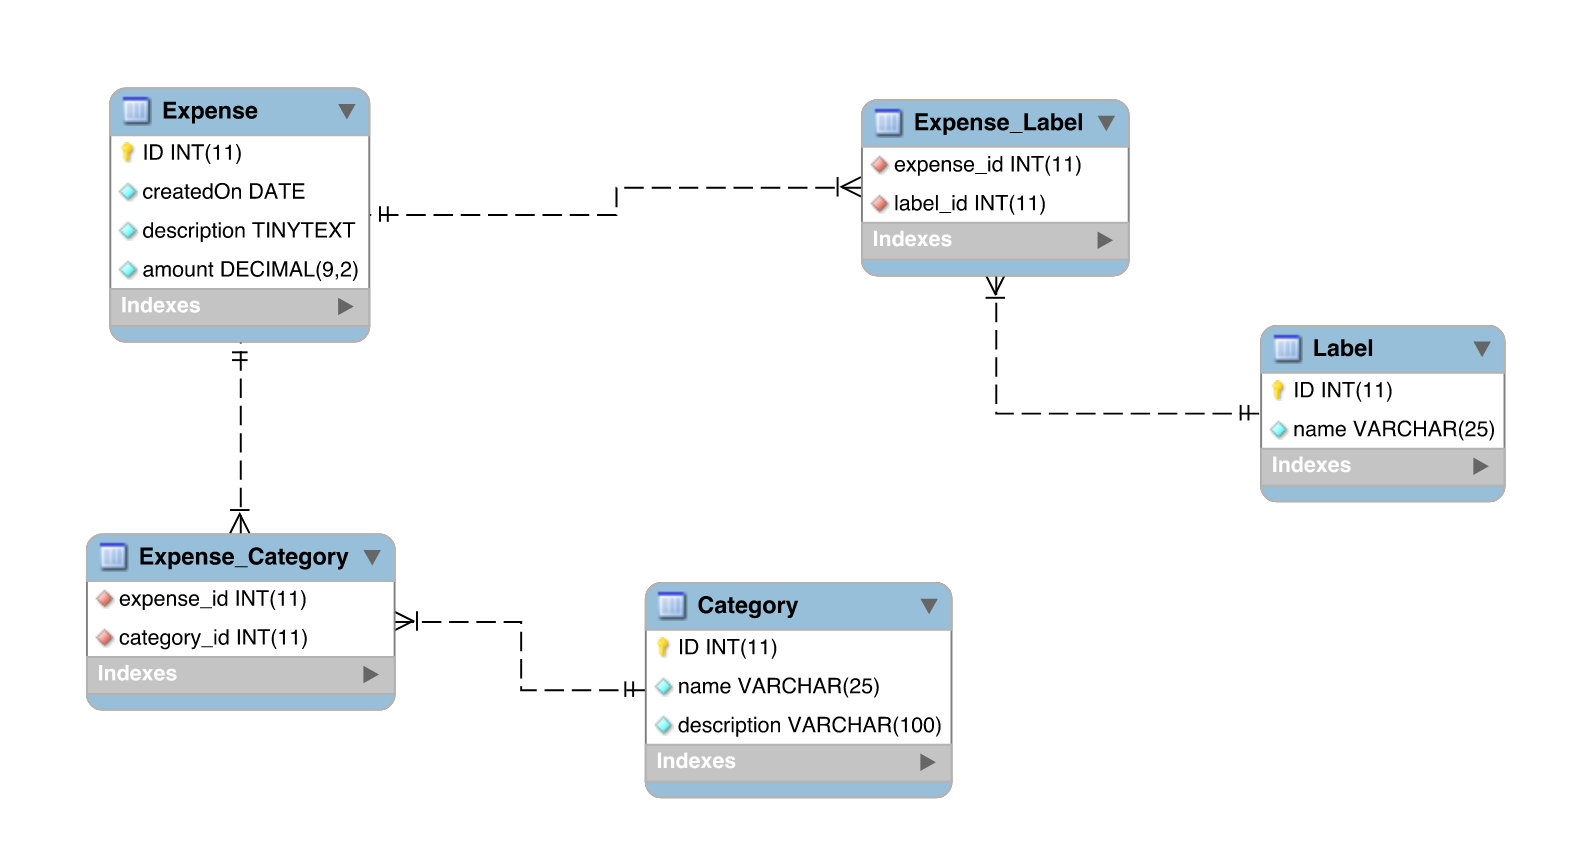
Thrifty operates with three entities named Expense, Label and Category.
An expense is a money transaction with a description field, a date and an amount. These fields are required, but not unique.
A label is an optional tag that can be applied to an expense, e.g. “Rent”. It has a single field, aka the name.
A category is way to aggregate various expenses, e.g. the user may create the category “Living” and include in it all expenses labeled “Rent” and “Utilities”. A category has a name and a description, both of which are required.
The tables holding the main entities can be created with the following statements:
CREATE TABLE `Expense` (
   `ID` int NOT NULL AUTO_INCREMENT,
   `createdOn` date NOT NULL,
   `description` tinytext NOT NULL,
   `amount` decimal(9,2) NOT NULL,
    PRIMARY KEY (`ID`)
);
CREATE TABLE `Label` (
   `ID` int NOT NULL AUTO_INCREMENT,
   `name` varchar(25) NOT NULL,
    PRIMARY KEY (`ID`),
    UNIQUE KEY `name` (`name`)
);
CREATE TABLE `Category` (
   `ID` int NOT NULL AUTO_INCREMENT,
   `name` varchar(25) NOT NULL,
   `description` varchar(100) NOT NULL,
    PRIMARY KEY (`ID`),
    UNIQUE KEY `name` (`name`)
);
To link labels and categories to expenses, we need many-to-many associations between Expense ↔ Label and Expense ↔ Category. The associations can be stored in two join tables:
CREATE TABLE Expense_Label(
   `expense_id` int NOT NULL,
   `label_id` int NOT NULL,
   FOREIGN KEY (`expense_id`) REFERENCES Expense(`ID`),
   FOREIGN KEY (`label_id`) REFERENCES Label(`ID`)
);
CREATE TABLE `Expense_Category` (
   `expense_id` int(11) NOT NULL,
   `category_id` int(11) NOT NULL,
   FOREIGN KEY (`expense_id`) REFERENCES Expense(`ID`),
   FOREIGN KEY (`category_id`) REFERENCES Category(`ID`)
);
This concludes the database part. Before we dive into the nuts and bolts of JAX-RS, let’s discuss a database design decision that will impact the entire system.
Identifying resources
By making the primary key for each entity an auto-incremented integer, we have decided that resources in our system will be identified by integers.
The alternative is to use a business key as the primary key. Business keys offer increased readability, especially in terms of the foreign key references in join tables and provide a more natural way to address resources through URLs.
However please note that the business keys of the Expense entity are not unique; different expenses can have the same amount, description and createdOn values (createdOn is simply a date without time information). As a result, the primary key in the Expense table has to be a synthetic key.
For consistency reasons, in the Label and Category tables the primary key is also an auto-incremented integer, although in these cases the primary key could have been the `name`.
The synthetic key approach provides some benefits, such as shorter URLs and immutability. However, as we will see, it also complicates things. One such difficulty concerns providing a logical equality test in the mapped entity classes.
REST with JAX-RS
REST is a foundational web technology, similarly to HTTP and HTML.
The REST client-server architecture enables computers to exchange data over an HTTP network, using a set of predetermined, stateless operations and following a set of conventions known as Representational State Transfer. Web Services that fully conform to this paradigm are called RESTful. A modern alternative to REST is GraphQL.
To implement a RESTful web service in Java we can use Spring framework. However I have used the Java API for RESTful Web Services, JAX-RS.
JAX-RS enables a Java developer to map a Java class as a web resource. A JAX-RS application is composed of at least one such resource class, packaged within a WAR file. The JAX-RS application is deployed to a Java EE Application Server – in our case WildFly.
Let’s see how to implement a Java resource class using JAX-RS.
Resource Classes
A resource class is a POJO that has at least one resource method – a method annotated with @Path or a request method designator, such as @GET or @POST.
Basic example of a Jax-Rs resource class:
import javax.ws.rs.GET;
import javax.ws.rs.Path;
import javax.ws.rs.Produces;

@Path("hello")
public class HelloService {

  @GET
  @Produces("text/html")
  public String getHtml() {
    return "<html><body><h1>Hello!</h1></body></html>";
  }
}
The class exposes a resource method named getHtml() which responds to GET requests. The method returns an HTTP response with media type text/html.
Let’s review the JAX-RS annotations in this example.
The @Path annotation decorating the class identifies the relative path of the resource. A @Path annotation value is actually a template that may include path variables. A path variable is a segment enclosed in braces, e.g. /users/{username}. Leading or trailing slashes are optional.
The @GET annotation is known as a request method designator. Similar request method designators are @POST, @PUT, @DELETE, @HEAD and @OPTIONS.
The @Produces annotation identifies the MIME type of the Http response. If the web method does not return void, the JAX-RS runtime maps the Http message body from the returned Java type.
ExpenseServiceBean resource class
Our application contains three resource classes: ExpenseServiceBean, LabelServiceBean and CategoryServiceBean. Let’s examine the first one.
ExpenseServiceBean class controls the Expense entity. An entity is a lightweight persistence domain object. An entity class typically represents a table in a relational database and each entity instance corresponds to a row in that table.
In an application using Java Persistence API, resource classes can inject an EntityManager and use it to get a reference to an entity instance or collection of such instances.
package org.codecritique.thrifty.ejb;

import...

@Stateless
@Path("expenses")
public class ExpenseServiceBean extends AbstractServiceBean {

  @PersistenceContext
  EntityManager em;

  @GET
  @Path("{id}")
  @Produces("application/json")
  public Response getExpense(@PathParam("id") int id) {
    Expense expense = em.find(Expense.class, id);
    if (expense == null)
      return notFound();
    return ok(expense);
  }

}
The getExpense() method looks up an Expense instance by its primary key. If a result is found, the method returns a 200 (OK) response, mapping the Http entity body from the Java type. If there is no Expense instance for the provided id, the method returns a 404 (Not Found) response.
Let’s go over the JAX-RS annotation in this example. Notice that both the class and the resource method are annotated with @Path.
Paths are relative; for a resource class the base URI is the application path and for a resource method the base URI is the effective URI of the containing class. The API endpoint associated to the method will be /thrifty/rest-api/expenses/{id}. The {id} segment is a path variable.
Notice the @PathParam annotation decorating the method parameter “id”.
A @PathParam annotation binds the value of a URI path variable to a resource method parameter, a resource class field or a resource bean property. At runtime, the resource class will parse the URI data that corresponds to the location of the {id} path segment in the URI.
Entity providers
The @Produces annotation identifies the MIME type of the Http response as “application/json”. So how exactly is an Expense converted to the desired JSON format?
Under the hood, RESTEasy, the JAX-RS specification implementation bundled with WildFly, uses the JavaBean model. That means all bean-style properties declared on a Java type will be automatically included in the JSON output. It’s also possible to exclude a bean property from the JSON output, by annotating its getter method with @JsonIgnore – which can be very useful in order to avoid a circular reference problem. Fields that do not have getter/setter methods are excluded by default.
A Java type can also be mapped to an HTTP entity body by implementing an entity provider. Providers supply mapping services between Http entities and Java types. There are two types of providers: MessageBodyReader and MessageBodyWriter.
PUT vs POST
The getExpense() method implements a READ operation. What about CREATE, UPDATE and DELETE? The case for DELETE is pretty straightforward, but the implementation for CREATE and UPDATE reveals an interesting REST API design problem.
package org.codecritique.thrifty.ejb;

import...

@Stateless
@Path("expenses")
public class ExpenseServiceBean extends AbstractServiceBean {

  @PersistenceContext
  EntityManager em;

  @POST
  @Consumes("application/json")
  public Response createExpense(Expense expense) {
    try {
      em.persist(expense);
    } catch (Exception e) {
      if (isConstraintViolationException(e))
        return badRequest("A constraint violation has occurred: " + e.getMessage());
      throw new WebApplicationException(e);
    }
    return created("/expenses/" + expense.getId());
  }

}

  @PUT
  @Path("{id}")
  @Consumes("application/json")
  public Response updateExpense(@PathParam("id") int id, Expense source) {
    Expense target;
    if ((target = em.find(Expense.class, id)) == null)
      return notFound();
    try {
      target.setDate(source.getDate());
      // update the other fields
      em.flush();
    } catch (Exception e) {
      if (isConstraintViolationException(e))
        return badRequest("A constraint violation has occurred: " + e.getMessage());
      throw new WebApplicationException(e);
    }
    return noContent();
  }

  // more resource methods
}
The createExpense() method creates an Expense and the updateExpense() method updates one. Let’s ignore the details and simply remark that the create method responds to a POST request and the update method responds to a PUT request.
We may naturally ask at this point, is the choice of PUT and POST complieant with the REST specification? It turns out many developers struggle with the same question. The confusion stems for the fact that both PUT and POST can be used to create or update resources.
So PUT implies that the resource URI either exists or must be created. However, in our application resource identification relies on a database auto-incremented ID, which the client cannot know in advance. Since only the origin server can declare the URI of a new resource, clients are effectively prohibited from creating resources with PUT.
A common application pattern is to use POST for CREATE operations and return a Location header whose value is the URI to the newly created resource. The createExpense() method illustrates this pattern.
To sum up, PUT has strict semantics which must be carefully considered. POST is more flexible and can mean anything: when using POST, it is up to the application to define the semantics.
Before we wrap up the REST part, let’s see how to configure the base URI of the JAX-RS application.
One option is to use an @ApplicationPath annotation in a subclass of javax.ws.rs.core.Application.
package org.codecritique.thrifty;

import javax.ws.rs.ApplicationPath;
import javax.ws.rs.core.Application;

@ApplicationPath("rest-api")
public class RestApplication extends Application { }
Note that the application path is relative to the context root path. Since the context root path has the same value as the WAR artifact name, the base URI of the application is: /thrifty/rest-api/.
Another way to configure the app is to use the servlet-mapping tag within the WAR’s web.xml deployment descriptor.
Final thoughts on JAX-RS
We have seen how to develop and configure a web service using JAX-RS.
JAX-RS includes many other annotations that our application does not use:
@QueryParam binds the value of a HTTP query parameter to a method parameter, a class field or bean property
@FormParameter binds to a parameter in a HTTP form
@CookieParam binds to a HTTP cookie value
@HeaderParam binds to a HTTP header value
@DefaultValue specifies a default value for the above bindings when the key is not found
@Context returns the entire context of the object (for example @Context HttpServletRequest request)
You can dive deeper into the topic by reading the excellent Java EE tutorial.
You may also want to browse through this dictionary of Http status codes.
Java Persistence
Time for a quick recap.
When the client submits a GET request to a URI, the JAX-RS runtime calls a resource method and returns a document in a format which is determined through the mechanism of content type negotiation. Let’s assume that the format is JSON or XML. Rather than manually writing the body, the resource method can return a Java programming language object; then, the JAX-RS runtime will map the HTTP entity body from the object which represents the resource.
If such an object is merged into the persistence context, all information regarding its data properties is persisted to the database.
The technique for mapping data in the object-oriented model to data in relational databases is called Object/Relational Mapping.
A Java entity is a lightweight persistence domain object. An entity typically represents a table in a database and each instance of the class represents a table row. Entity classes are mapped using Java Persistence API annotations.
Let’s examine the Expense entity.
package org.codecritique.thrifty.entity;

import ...

@Entity
@Table(name="Expense")
public class Expense extends BaseEntity {

  @NotNull
  @Column(name = "createdOn")
  private LocalDate date;

  @NotNull
  private String description;

  @NotNull
  private Double amount;

  @ManyToMany(cascade = CascadeType.MERGE, fetch = FetchType.EAGER)
  @JoinTable(
    name = "Expense_Label",
    joinColumns = @JoinColumn(name = "expense_id"),
    inverseJoinColumns = @JoinColumn(name = "label_id"))
  private Set<Label> labels;

  @ManyToMany(cascade = CascadeType.MERGE, fetch = FetchType.EAGER)
  @JoinTable(
   name = "Expense_Category",
   joinColumns = @JoinColumn(name = "expense_id"),
   inverseJoinColumns = @JoinColumn(name = "category_id"))
  private Set<Category> categories;

  // getters and setters omitted for brevity...

  public void removeLabel(Label label) {
    labels.remove(label);
  }

  public void removeCategory(Category category) {
   categories.remove(category);
  }

  @Override
  public boolean equals(Object o) {
   if (o == this) return true;
   else if (!(o instanceof Expense)) return false;
   return Objects.equals(id, ((Expense) o).id);
  }

  @Override
  public int hashCode() {
   return 17;
  }

  @Override
  public String toString() {
   return "Expense[" + id + "]";
  }
}
Entity classes are decorated with the javax.persistence.Entity. The @Table(name="Expense") annotation value identifies the corresponding table.
Notice that the Expense class extends BaseEntity.
package org.codecritique.thrifty.entity;

import ...

@MappedSuperclass
public abstract class BaseEntity implements Serializable {

  @Id
  @GeneratedValue(strategy = GenerationType.IDENTITY)
  Integer id;

  public Integer getId() {
   return id;
  }
}
Using the entity inheritance mechanism, our entities inherit some common mapping information, namely the object identifier property. To inherit a persistent field or property, the parent class must be annotated with @MappedSuperclass.
Let’s also note that all entities must have an identifier or primary key property.
Various strategies are available to generate a primary key. Here we passed a GenerationType.IDENTITY value to indicate that the persistence provider must assign primary keys for the entity using a database identity column.
The javax.validation.constraints.NotNull() annotation enforces that the annotated field cannot be null.
We leverage the JavaBeans validation API to ensure that Expense entities are valid. As a consequence, if we pass an incomplete bean to a resource method, such as createExpense(Expense expense), a validation error will be raised before Hibernate attempts to write data to the database.
A constraint violation has occurred: Validation failed for classes [org.codecritique.thrifty.entity.Expense] during persist time for groups [javax.validation.groups.Default, ]
List of constraint violations:[
ConstraintViolationImpl{interpolatedMessage='must not be null', propertyPath=amount, rootBeanClass=class org.codecritique.thrifty.entity.Expense, messageTemplate='{javax.validation.constraints.NotNull.message}'}
The persistence provider will automatically perform validation on entities with persistent fields or properties annotated with bean validation constraints immediately after the PrePersist, PreUpdate, and PreRemove lifecycle events.
Persistent fields and properties
The persistent state of an entity may be expressed through instance variables (persistent fields) or bean-style properties with accessor/mutator methods (persistent properties). Persistent fields must be private, protected or package-protected. Clients must access the entity’s state through accessor or business methods.
Mapping a many-to-many association
As mentioned in the Entity model chapter, there is a many-to-many associative relationship between Expense ↔ Label and Expense ↔ Category pairs. Many-to-many means each element of the pair can be related to multiple elements of the other kind.
Multiplicity relationships can be of the following types: one-to-one, one-to-many, many-to-one and many-to-many or 1:1, 1:n, n:1, m:n.
The relationship is bidirectional if both entities “know” about each other, i.e. each of them has a field or property that refers to the other entity, and unidirectional otherwise. In a bidirectional relationship we distinguish between the owning and inverse side of the relationship. Direction is important because only changes made from the owning side are propagated to the database.
Let’s see how to map the many-to-many association between Expense and Label using JPA annotations.
In the database, the parent tables are linked through the Expense_Label join table. The join table is specified on the owning side of the relationship.
The entity on the inverse side refers to the owning side using the mappedBy element.
@Entity
@Table(name="Label")
public class Label extends BaseEntity {

  @ManyToMany(mappedBy = "labels")
  private Set<Expense> expenses;

  @JsonIgnore
  public Set<Expense> getExpenses() {
    return expenses;
  }
}
Circular JSON reference problem
Notice that the getter method for the Expenses property is annotated with @JsonIgnore. To understand why we need it, consider that the object graph of a Label instance references a collection of Expense, and that each Expense further references a collection of Label, and so forth, ad infinitum. Without the @JsonIgnore annotation, when we attempt to serialize a Label into its JSON representation, the application will run out of memory or throw a circular reference error.
Keeping both sides of a many-to-many relationship in sync
In a many-to-many relationship, special care must be taken when we delete an instance of an entity on the inverse side of the relationship. To keep both sides in sync, we need to call a remove() method defined on the owning side.
Let’s assume we call a resource method to delete a Label. If we jump straight to EntityManager.remove(), Hibernate will attempt to execute a DELETE statement against the Label table. In the server log file, we’ll see something like this:
DELETE from Label where ID=?
However, if the primary key of the Label we’re about to delete is referenced in the Expense_Label join table, the query will trigger a foreign key constraint violation exception.
To prevent this error, before we delete a Label, for each Expense associated with it, we need to call a removeLabel() method defined on the owning-side entity, until we have deleted all rows in the join table linking that Label with an Expense. This is so because only changes from the owning side are propagated to the database.
public Response deleteLabel(@PathParam("id") int id) {
  try {
    Label label = em.find(Label.class, id);
    if (label != null) {
     for(Expense expense : label.getExpenses()) {
       expense.removeLabel(label);
     }
    em.remove(label);
   }
 } catch (Exception e) {
   throw new WebApplicationException(e);
 }
 return noContent();
}
The converse operation to delete an instance of an entity on the owning side is much easier. When we delete an Expense, Hibernate generates the required DELETE statements for us.
2018-12-17 12:47:11,280 INFO [stdout] (default task-2) Hibernate: delete from Expense_Category where expense_id=?
2018-12-17 12:47:11,282 INFO [stdout] (default task-2) Hibernate: delete from Expense_Label where expense_id=?
2018-12-17 12:47:11,283 INFO [stdout] (default task-2) Hibernate: delete from Expense where id=?
Overriding hashCode() and equals()
The collection of items resulting from a many-to-many relationship can be conveniently represented with a java.util.List. However, I chose to use a java.util.Set in my code, wanting to emphasize the uniqueness of the items in the collection. Perhaps this was not the best choice. The decision prompted the need to override equals() and hashCode() in entity classes, which led to some problems.
One issue was providing a logical equality test for Expense instances. The problem is that the entity does not have naturally unique properties. Only the id field is unique, but the id is null while the object is in a Transient state. Only in Persistent (Managed) state, an Expense instance can be assumed to have a unique id.
@Override
public boolean equals(Object o) {
  if (o == this) return true;
  else if (!(o instanceof Expense)) return false;
  return Objects.equals(id, ((Expense) o).id);
}

@Override
public int hashCode() {
  return 17;
}
Thus in the equals() implementation, we ignore any comparison between the createdOn, amount and description fields. As these fields may be identical for different expenses, they are irrelevant to the equality test.
In the hashCode() implementation, we must exclude the id field from the hash value computation or risk inconsistent behavior across state transitions. We’re forced to return a constant, which degrades the performance of hash-based collections.
The only solution is to use a business key as the primary key of the entity. The primary key could be mapped to the `createdOn` column, provided we replace the DATE() type with DATETIME() and enforce the UNIQUE constraint.
Notes on developing the web client with Angular 6
Angular components are written in TypeScript, a language which can be described as a superset of JavaScript. TypeScript adds types to JavaScript.
To gain clarity and benefit from static type checking, we can define the model types used by our application in a index.ts file.
Notice that the Expense, Category and Label types are not shaped in exactly the same way as the corresponding Java types. The Category interface for example, has three optional properties named balance, dateRange and mapYearBalance, which are not present in the JSON representation of a Category. The values of the additional properties are computed dynamically when the object is created.
The index.ts file also defines an interface called Account. The Account object represents the single point of access to user data. The properties of the object are optional, because there might be no data at all (for instance, the user might have deleted all of their labels, expenses, categories etc.).
RestService class
The responsibility of communicating with the back-end is delegated to the RestService class. This Angular service enables all the CRUD operations that we talked about.
The most complex of the class’s methods is getAccount(), which returns the Account object, as an Observable. The Account object is built, cached and immediately frozen, to prevent client code from accidentally overwriting the data.
import { Injectable } from '@angular/core';
import { HttpClient } from '@angular/common/http';
import { Observable, Subject, forkJoin } from 'rxjs';
import { tap, switchMap } from 'rxjs/operators';
import { of } from 'rxjs/index';

import { Account, Category, Label, Expense } from '../model';
import { Utils } from '../util/utils';

@Injectable()
export class RestService {

  private account: Account;

  private subject: Subject<Account> = new Subject();

  public dataReady = this.subject.asObservable();

  constructor(private http: HttpClient) { }

  public getAccount(): Observable<Account> {
   if (this.account) {
    console.log('reading cached data');
    return of(this.account);
   } else {
     console.log('fetching data');
     return forkJoin(
       this.http.get<Expense[]>('expenses'),
       this.http.get<Label[]>('labels'),
       this.http.get<Category[]>('categories'))
      .pipe(switchMap(data => {
         this.account = Utils.buildAccount(data[0], data[1], data[2]);
         Utils.deepFreeze(this.account);
         this.subject.next(this.account);
          return of(this.account);
      }));
   }
 }
}
The RestService calls the backend service using an injected HttpClient instance. As HttpClient API supports typed responses, once again we can benefit from static type checking, when we consume the response.
Notice that we use the forkJoin operator to combine the values emitted by multiple Observables into an array. The technique is extremely helpful if you depend on data aggregated from multiple HTTP responses.
The getAccount() function is a convenience method to simplify the initialization of Angular components. Thus, components do not need to worry about fetching data from multiple sources: they can fetch all external data with a single method call.
Angular form validation
Angular offers powerful tools to process and validate forms. Let’s examine the view which enables the user to create a new label.
The goal here is to have a simple form allowing the user to enter the name for the new label. However, we need to ensure that the name chosen by the user does not conflict with existing label names, which implies that the component controlling the view must firstly retrieve existing labels.
To this end, the ngOnInit method imports the Account object and maps labels to an array of string, then we call the createForm() method which builds the form.
Forms in Angular apps can be template-driven or reactive. In our application we use reactive forms, which can be created with the FormBuilder service.
Notice that when we build the create-label form we register two validators, using the built-in functions that ship with Angular: required and maxLength. We also register a custom validator: forbiddenNames.
The actual validator function takes a form control object and returns a map of validation errors or null, if the value passes validation.
If we look at the form template, we can see that all three validators control the name field: that means the value of this field is, first of all, required, can be maximum 25 characters long and must be different from existing label names.
We can also notice that the `forbidden names` and `required` validators correspond with the `NOT NULL` and `UNIQUE` constraints defined on the `name` field in the Label table.
How to build and deploy Thrifty
Building the app is quite easy, assuming the following dependencies are available on your machine:
MySQL (5.7.21 or higher)
JDK 1.8
Maven (3.6.0 or higher)
WildFly (14.0.0 or higher)
Angular 6.0
Download the source code
Clone the source code and the Thrifty database dump file.
The next step is to deploy the Web Service application to WildFly. There’s no need to configure a datasource connection manually, because a `ds.xml` descriptor is bundled with the WAR file.
Make sure both MySQL Server and WildFly Java Application Server are running and execute.
$ mvn clean wildfly:deploy
Afterwards we can examine the server log file to rule out deploy errors.
$ less $WILDFLY_HOME/standalone/log/server.log
Build and serve the front-end web app
Assuming the previous steps have been successful, we can now build and serve the Thrifty Angular app.
$ ng serve
Finally, we open http://localhost:4200 in the browser and load the web application.
Deploying Thrifty to a remote web server
Both back-end and front-end components can be easily deployed to a remote web server.
The Java application can be deployed simply by executing the deploy goal of the Maven WildFly plugin.
$ mvn wildfly:deploy
However, to deploy the Java app to the remote instance of WildFly and not to the local one, there’s a trick. Before we execute the Maven command, we need to kill the WildFly process on the local machine and forward the local port 9990 TCP connection to port 9990 on the remote host.
To deploy the Angular web app, we can leverage the Ansible deploy script bundled with the front-end app files. Of course, you will need to adapt the script to your infrastructure details and have Ansible installed on the remote machine. The script can be called with the command: